프레젠테이션

|
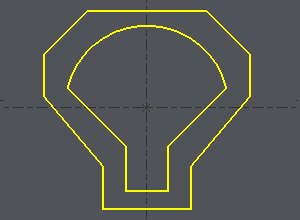
싱크로 포인트는 4축 모드에서 두 프로파일 사이의 와이어 경로를 강제하기 위해 가공할 2개의 프로파일에 배치됩니다. |
싱크로 포인트를 배치하는 3단계가 있습니다.
-
2개의 프로파일 정의
-
싱크로 포인트가 필요한지 확인하기 위한 결과 생성
-
자동, 수동 또는 결합 모드로 싱크로 포인트 정의
프로파일 정의
1/ Define the profiles
선택 상자를 사용하거나 2개의 프로파일을 차례로 클릭합니다.
예제에 표시된 것처럼 요소의 중간에 시작점을 정의하려면:
-
프로파일을 클릭하고,
-
시작 요소를 클릭하고, 커서를 요소를 따라 이동하여 시작 위치를 클릭하거나 버튼을 클릭하여 요소의 시작 또는 중간을 선택합니다. 여기서는 중간을 선택합니다.
-
끝 요소(예제에서는 동일한 요소)를 클릭하고, 커서를 요소를 따라 이동하여 끝 위치를 클릭하거나 버튼을 클릭하여 요소의 중간 또는 끝을 선택합니다. 여기서는 중간을 선택합니다.
|

|
2/ Outcome
-
Once the profiles are done, the dialog bar appears : Click on About the profile [1] . A message box give you the characteristics of the 2 profiles selected, number of elements, number of synchro points.
3/ To define the synchro points
|
|
프로파일 정보 |
|
|
선택한 프로파일의 방향 반전 |
|
|
싱크로 추가 - 싱크로 포인트의 수동 생성 |
|
|
2개 영역 간 동기화 지점 자동 생성. ' 전체 ' 버튼을 클릭하면 전체 프로파일의 생성이 자동으로 이루어집니다. |
|
|
클릭하여 동기화 지점 삭제. |
|
|
요소 절단 |
녹색 체크 표시 ' 다른 프로파일 '를 클릭하여 확인하거나 다른 2개의 프로파일에 동기화 지점을 생성합니다.
빨간색 십자표시를 클릭하여 생성된 모든 동기화 지점을 취소합니다.
동기화 지점을 생성할 때 수동 및 자동 생성을 결합할 수 있습니다. 이는 위의 두 번째 예에서 설명하는 내용입니다.
자동 방법
|
Click on [1] . There are 7 elements on a profile and 11 in the other one. It can be machined with the cycle 4 axes contour/contour but it is not optimized. If you want to optimize the toolpath, you have to set up synchro points. |
|
|
The synchro point can only be defined on existing points or elements extremities. You have to cut an element : click on [6] and then click on the arc, you can move the cursor all along the element, click on the screen when you want to cut. A circle (tangency) or a square (sharp angle) is displayed where you cut. |
흰색 커서로 호 절단 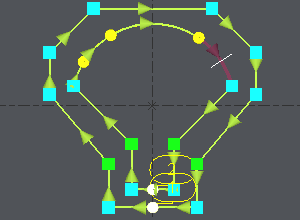
|
|
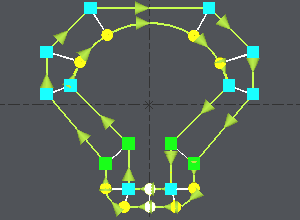
The number of elements is now the same on the 2 profiles : Click on [4] 그리고 ' 전체 '를 클릭하면 2개 프로파일의 모든 끝점이 2개씩 연결됩니다. |
동기화 지점이 자동으로 생성됩니다 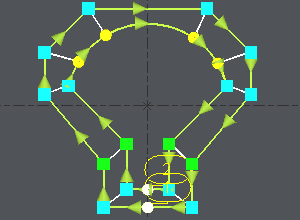
|
수동 및 자동 방법 결합
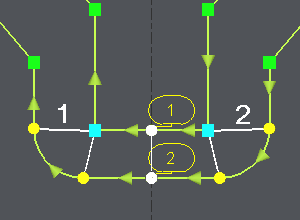
2개의 모서리가 더 있는 동일한 예를 들어 보겠습니다. 여기서는 이중 동기화 지점을 생성해야 하며 자동 모드에서는 불가능합니다.
|
Click on [1] to have information about the 2 profiles. |
|
|
Click on [3] , click on the angle (blue square) and click on an extremity of the corner (yellow circle), click again on the angle (blue square), a message warns you about the creation of a double synchro point, click on OK and click on the other extremity of the corner (yellow circle). 다른 모서리에서 동일한 작업을 반복합니다. |
|
|
The synchro point can only be defined on existing points or elements extremities. You have to cut an element : click on [6] and then click on the arc, you can move the cursor all along the element, click on the screen when you want to cut. A circle (tangency) or a square (sharp angle) is displayed where you cut. |
|
|
We want to create synchro points between the 2 corners already treated : click on [4] , 이미 정의된 2개의 동기화 지점( 1 , 이미지의 2 )을 클릭하여 처리할 영역을 제한하면 2개 프로파일의 모든 끝점이 2개씩 연결됩니다. |
Once the synchro points are set up, click on [1] to obtain information for the synchro points created , if the machining is possible you are told about it. Then you can go to the machining editor and choose the cycle 4 axes cnt/cnt.